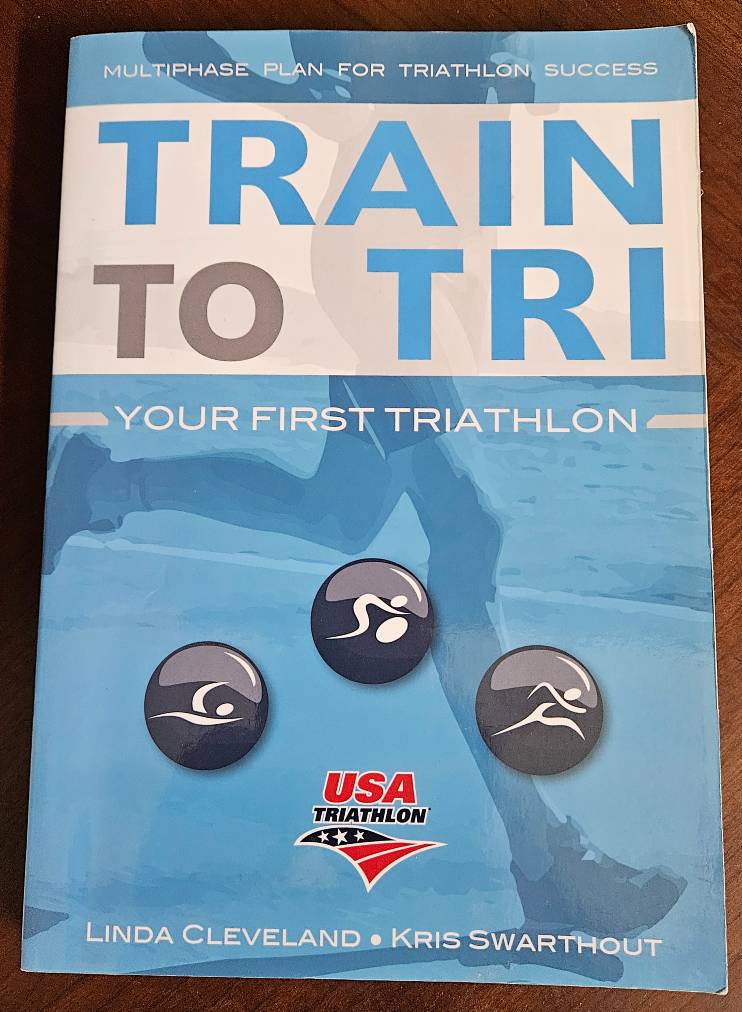
Review – Train to Tri: Your First Triathlon

Looking to complete your first triathlon? Want to inspire and motivate your children, grandchildren, parents, friends, or co-workers?

If so, Train To Tri: Your First Triathlon by Linda Cleveland and Kris Swarthout is for you.  This 246-page guide provides the essential information needed to prepare for your first triathlon.

Authors: Linda Cleveland and Kris Swarthout, both USA Triathlon Level 2 coaches with lots of experience competing in triathlon and coaching triathletes.

Publisher: Human Kinetics

Who is this book for?

Train To Tri is written primarily for those considering or already committed to completing their first sprint or standard (formerly called Olympic) distance triathlon.

Even though it is aimed at first-timers, it is not just for those doing their first triathlon.  While I have completed over 40 sprint triathlons, I found several useful training tipsI have already put some of them to use.

What does the book cover?

The book opens with a 24-question Triathlon Readiness Assessment.  Results of the self-assessment help the future triathlete identify with one of three categories – bronze, silver, or gold – and select the training plan included later in the book.  This initial section also provides guidelines for choosing the specific race for your first triathlon.

I like the basic strategy of the first triathlon training plan laid out by the authors – to focus most of the training effort on your weakest leg.

You should focus the most time and effort on [your third strongest sport] to develop strength and endurance as well as improve technique. (page 9)

Gear

Once you decide to do a triathlon, you will quickly learn about the incredible amount of clothing and equipment (called ‘gear’ in the triathlon world) surrounding the sport.  Since not all the gear is necessary for your first triathlon, the authors distinguish between the ‘necessary’ and the ‘nice to have’ or ‘you can wait and decide after your first race’ gear.

Your Triathlon Support Group

Training with a group can provide the extra motivation needed to push through a training program and reap the rewards of completing your first triathlon.  A group can also help you to improve your technique more quickly.

In this chapter, the authors suggest ways to create a support network for your training in swimming, biking, and running that includes various clubs and your family, friends, and co-workers.

You may have various support group options.  For example, if you live in a retirement community, such as The Villages, Florida, you have a built-in support group in The Villages Triathlon Club.  Members train and race together with encouragement galore.

If you are working in an area without a triathlon training club in the area, you can create your own support group through a local fitness center, community pool, bike shop, and running store.  This provides flexibility to follow your specific training plan while enlisting the support of instructors and others with experience from which you can benefit.


Swim

The chapter on swimming covers the basic elements of an efficient stroke with illustrations for a proper freestyle technique.  I appreciated the suggestion for traveling and swimming, especially the advice for making use of the typical small hotel pool.

Interestingly, many triathletes find swimming to be their weakest sport.  If you are in that group, get comfortable being in the water and with swimming with other people as you will experience on race day.  Whether swimming in a pool or in open water, you will inevitably come close to, if not in contact with, other swimmers.  Staying calm is the key to finishing the swim.

If the race you choose includes an open water swim, you will want to practice swimming in open water to become familiar with ‘sighting’.   For safety reasons, I recommend adding the ISHOF Safe Swimmer (see also below) to your list of gear.

Bike

Most of us know how to ride a bicycle.  However, many have never ridden in a large group at speeds associated with a triathlon.

Therefore, the focus of this chapter is safety.  According to the authors, safety in biking begins with a review of the various components of the bicycle to make sure that they are each in good working order.   They also describe the most important cycling skills and suggestions on how to hone these, both individually and in group rides.

When riding on the road in traffic, you need to follow the rules of the road as if you were driving a car. (page 78)

Run

We all know how to run. Right?  Well, not necessarily in a way that is the most efficient or that minimizes the possibility for injuries.  About half of this chapter is dedicated to proper cadence (steps per minute) and body form.  The rest of the chapter introduces training with a heart rate monitor and training involving the three-run types included in the weekly training plans.

If you take one thing from this chapter, remember to progress slowly (the ‘10% per week’ rule) to minimize the likelihood of injury.  Unfortunately, we need to be reminded of this every so often.

Strength and Flexibility

Building strength and increasing flexibility are two keys to increasing your performance in triathlon.   For many of us who spend a lot of time sitting during their workday, lack of flexibility can be the major root cause of injury.   The authors show that a relatively small amount of time spent in strength training and stretching can lead to better performance and fewer injuries.  Plus, these are another way to ‘mix it up’ and keep the training interesting and fresh.

Nutrition and Rest

If we all know how to run, most of us are even better at fueling (aka eating).  The challenge is to eat properly.  It becomes even more complicated when we are exercising, burning more calories, trying to build muscle, and recovering from the stress of training.

Triathlon training can be a great way to shed pounds and improve your health.   Eating the right foods in the right amount and at the right time is the focus of this chapter.  The authors are clear: “Although your daily caloric burn will certainly increase based on your training volume, you don’t have a license to hit the buffet for every meal”.

The chapter begins by showing us how to calculate two important numbers related to exercise – resting metabolic rate (RMR) and caloric burn rate.  The authors discuss how to eat (or ‘fuel’ as they define it) throughout the day. This includes eating before, during, and after workouts.  Sample menus for triathlon training days help to illustrate the principles of proper fueling.

The chapter concludes with a discussion about the importance of rest within a process known as periodization.  The authors even provide a simple test to help us determine when our body is telling us to take a day of rest.

If you do not get adequate rest, the muscles will fatigue and eventually fail, resulting in injury. (page 139)

Training plans

It’s now time to put the information from the previous chapters together and begin to train for your first triathlon.   Sample 8-week training plans are provided for bronze-, silver-, and gold-level athletes for both sprint and standard distance triathlons.    I appreciate that the authors show readers how to tailor the plans to meet their particular strengths and weaknesses and their individual schedules.

Preparing to race

I love this section.  Here, the authors take the new triathlete down the ‘home stretch’ to completing their first race.

Filled with practical advice, the authors walk us through the two weeks leading up to the race.  With greater detail for race day, you can feel the thrill that begins upon waking and includes crossing the finish line and heading to the refreshment area for a cold drink and banana.

Related post: How to Choose Your Next Triathlon

Why get this book?

Train To Tri is pragmatic and focused.  It includes essential information for each of the sports of triathlon.  The authors season the information with the nuances of practicing them within a triathlon.

You can trust the USAT-certified coaches with this ‘no-nonsense’ guide.

Let us know what you think of Train To Tri

Share your experience with this book in the Comments below.

Comments: Please note that I review all comments before they are posted. You will be notified by email when your comment is approved. Even if you do not submit a comment, you may subscribe to be notified when a comment is published.

Disclaimer: Please note that SeniorTriathletes.com is a participant in the Amazon Services LLC Associates Program.  This is an affiliate advertising program that provide a way for sites to earn advertising fees.  They do this by advertising and linking to amazon.com. Amazon, the Amazon logo, AmazonSupply, and the AmazonSupply logo are trademarks of Amazon.com, Inc. or its affiliates.  As an affiliate, I will receive a small commission for any purchases of this product that you make through Amazon.

This post was originally published on January 21, 2018.  It was updated on September 5, 2025.

My Experience with Mark Allen’s Strength Training for Triathletes

This post, which documents the approach I have used for strength training for triathlon over the past several years, was first published on March 14, 2019. The latest update was published on August 21, 2025.

Credible Endorsements for Strength Training

After competing in sprint triathlons for eight years, my training had become sloppy. I had lost the discipline of the early years. I had nearly stopped strength training, focusing instead on cardio and endurance training. And to top it off, my performance was poorer. I was slower than ever and struggling with knee pain while running.

The article entitled Mark Allen’s 12 Best Strength Exercises jumped out at me as I skimmed my emails one winter morning. Having read about triathlon for over eight years, I knew of Mark Allen and considered him a credible source of information. I became even more interested in the plan once I realized that this strength training plan had also been a turning point for Mark. In the first full season after following this program, Mark won three international multi-sport endurance events, including the IRONMAN World Championship in Kona-Kailua, Hawaii.

Soon after, I read about Judy Cole, a 73-year-old ultra runner. Judy had started running every day during her early 30s. However, early on, she had problems with her knees. Following the advice of her running partner to strengthen her quads and hamstrings “became a game changer.”

I had also been struggling with knee pain, something I had not faced for several years. Judy’s experience sounded oh-so-familiar, so I committed to Mark’s plan.

Introducing Mark Allen’s Strength Training Program

This post is part introduction to and part journal of my experience with Mark Allen’s strength training program.

The table below lists the twelve exercises in this program along with the triathlon event(s) most impacted by the exercise. While I vary the order in which they are performed, these are the same exercises I do two days per week, except when I do not have access to the equipment.

Mark’s original article includes videos that show how to perform each of them correctly. I urge you to watch the videos before starting the program. And, if you are anything like me, you will find it helpful to watch periodically to make sure your form and breathing are correct.

ExerciseHelps Most With
Lateral Pull-DownSwim
Leg ExtensionRun
Leg CurlBike, Run
Bench PressSwim
SquatBike, Run
Lateral Dumbbell RaiseSwim
Calf RaiseRun
Dumbbell PulloverSwim
Backward LungeRun
Bicep CurlSwim, Bike
Tricep ExtensionSwim
Leg PressBike, Run

Starting with my first time using Mark’s routine, I have recorded the number of repetitions and weights for each exercise in a Google Sheet. I have also noted when I could use a heavier weight in the next session and any pain or soreness I felt during or after the session.

If you would like to follow Mark Allen’s strength training program, comment below or email me at seniortriathletes@gmail.com. I will share the Google Sheet I use to record my results and progress.

Strength Training Modified: Custom Warm-Up

Like most training, warming up the muscles is helpful, and may prevent injury. Over the years, I have varied the warmup,

I now start each session, no matter the Phase, with a series of bodyweight and band exercises that serve as a whole-body warm-up. I began the hip, shoulder, arms, and back exercises through physical therapy, first to address pain in my right glute and later to eliminate upper back spasms.

When done properly, I end this 20-minute period having broken a sweat and feeling loose. The table below provides more detail on this part of what is a 70-minute routine, two days each week.

Warm-Up TargetDetails
HipsAll-4s side leg lift (“fire hydrants”) – 30 each side
Side-lying hip abduction with internal rotation – 30 each side
Side-lying leg lift – 30 each side
Shoulders, Arms, Upper BackShoulder external rotation with scapular retraction – 2 x 15
Shoulder single-arm cross body extension – 2 x 15
Shoulder horizontal abduction – 2 x 15
Standing shoulder row with anchored band resistance – 2 x 15
Shoulder extension with band resistance – 2 x 15
CoreBoat pose – 1 minute
Bridge – 1 minute
Side plank – 1 minute each side
Plank – 1 minute

Related post: ‘At the Core’ – Strength Training to Help Seniors Perform Better and Avoid Injury

After some sessions (depending on time available), I complete another 10–15 minutes of cardio. I finish with static stretches and/or foam rolling of my hamstrings, quads, calves, and upper and lower back.

Periodically, I re-read the original article and watch the videos to make certain I perform each exercise using the correct form and breathing.

exercise  machines
Mark Allen’s strength training program for triathletes involves a mix of exercises that involve free weights, weight machines, dumbbells, and body weight.

Endurance Strength Training – Phase 2

In my initial use of this program, I moved to Phase 2 after a few weeks with the Phase 1. The main difference between these two phases is that Phase 2 involves two sets of 12–15 repetitions of each exercise with 90 seconds rest between sets, rather than one set in Phase 1. As in Phase 1, I completed two sessions per week with at least one day, but usually three days, between them.

During Phase 1, I selected weights for each of the exercises for which I could complete 15 repetitions with good form. For some, I was able to increase the weight slightly during the four weeks.

In transitioning into Phase 2, I used the same weights as at the end of Phase 1. However, in the first two sessions, I completed only 12 (rather than 15) repetitions in each of the two sets (except for squats, for which I completed 15). I did this following the principle of preventing injury by increasing intensity gradually.

Continuing with this principle, I increased the number of repetitions to 15 for the first set in week 2, while the second set still involved 12. In week 3 and beyond of Phase 2, I completed 15 repetitions for both sets.

“Increasing the intensity, time, or type of activity too quickly is one common reason for a sports injury. To prevent this, many fitness experts recommend that both novice and expert athletes follow the ten percent rule, which sets a limit on increases in weekly training. This guideline simply states that you should increase your activity no more than 10 percent per week. That includes distance, intensity, weight lifted, and length of your exercise session.” – Very Well Fit

Lessons from Strength Training for Triathletes

I have learned some important lessons while using this plan:

  • Be patient – the results may seem to come slowly, but they will come.
  • Become familiar with the specific equipment you will use in the program. In addition to watching the videos in Mark Allen’s article, I watched others, especially those working with a personal trainer.
  • Add weight only after a few sessions (minimum two) when the weight feels easy while maintaining good form.
Sample of Google sheet used for tracking progress with my strength training based on Mark Allen’s program for triathletes.

What If You Don’t Have Access to a Gym?

There are many reasons for us not having access to weights or weight machines used in Mark Allen’s program. If you don’t have gym equipment, consider the approaches described by two other sources.

Training for the Run

In a Stryd For the Love of Running webinar, Dr. Jinger Gottschall presented six at-home exercises for a strong core and improved run mechanics.

The six include three bodyweight moves aimed at improving run mechanics:

Dr. Gottschall recommends performing 100 repetitions (50 on each side for lunges and abductors). I have reached 50 reps per session twice per week. If you want more challenge, add weight. If you don’t have free weights, use a water bottle or milk jug. (Water weighs 8.3 lbs per gallon / 1 kg per liter.)

The second part of Jinger’s session includes three core exercises (front plank, side plank, glute bridge). These overlap with the five core exercises (front plank, side plank each side, glute bridge, and boat pose) that I perform.

Training for the Swim

During the 2020 quarantine around COVID-19, I joined Tri Swim Success Online Triathlon Swim Training Program. As part of the membership, I received access to video training with dry-land resistance band exercises for swim fitness.

Let us know in the Comments what alternates to training in the gym with weights and machines you have found.

New to Strength Training?

If you are getting started with triathlon training and/or strength training, here are two must-read posts:

You may be interested in this article from Silver Sneakers with advice on how to begin a strength training program.

What is Your Approach to Strength Training?

Let us know below what you have learned from your strength training? Have you found any “must-do” exercises or targets? Have you found exercises in yoga or other sports to be effective? Please share your thoughts in the Comments below.

Comments: Please note that I review all comments before they are posted. You will be notified by email when your comment is approved. Even if you do not submit a comment, you may subscribe to be notified when a comment is published.

Foam Rolling vs. Massage Gun: A Recovery Showdown for Senior Triathletes

by Jim Riley and Terry VanderWert

After publishing an update on my experience with foam rolling, a reader asked for information comparing foam rolling and muscle relaxation using a massage gun. Jim Riley, senior triathlete and co-author for this post, commented on the request. Later, we agreed to collaborate on this post in which we compare foam rolling and massage gun therapy for recovery based on science and our experiences.

Disclaimer: This post is for informational purposes only and is not intended to replace professional medical advice—please consult your healthcare provider before starting any new recovery regimen.

Why Recovery Matters More as We Age

Recovery is crucial for senior triathletes. As we age, our muscles demand more attention to maintain flexibility, support training volume, and prevent injuries. Two popular self-massage tools used by older multisport endurance athletes are foam rollers and massage guns.

Is one better than the other? Should you invest in both? Which one fits better into your daily routine? These are the questions we set out to answer.

How These Tools Actually Work

Foam Rolling: The Foundation Method

Foam rolling is a form of self-myofascial release (SMR)—essentially, you’re giving yourself a deep tissue massage. You apply your body weight to a firm roller, then roll back and forth to loosen tight spots or along the length of muscles to work out tension. The advantage over traditional stretching is that foam rolling lets you target tight areas and smaller muscles more effectively and efficiently.

Some newer foam rollers include low-frequency vibration (37 to 67 cycles per second) in addition to the rolling action, though the research on added benefits is still developing.

Massage Guns: Precision Power Tools

Massage guns deliver what researchers call percussive therapy—rapid, repetitive pulses that penetrate deep into tissue, mimicking the tapotement technique used in professional massage. These handheld devices excel at targeting specific pressure points with precision rather than covering broad areas. Advanced models, like Theragun, even combine the percussive action with heat or cold therapy.

Foam rolling vs. massage gun. Picture shows the Bob and Brad C2 massage gun with its five head options.
Bob and Brad C2 Massage Gun and its five heads for controlling pressure and coverage.

What the Research Actually Shows

We reviewed several studies and comprehensive research reviews to understand what science says about both tools. Click here if you want to go a little deeper into the research finds. In the meantime, here’s what matters most for senior triathletes.

Recovery and Flexibility Benefits

Both tools deliver real benefits for range of motion and muscle stiffness—the areas most important for aging athletes. Multiple large-scale research reviews confirm that both foam rolling and massage guns significantly improve flexibility and help muscles recover between training sessions.

What this means for you: Either tool will help you maintain the flexibility needed for efficient swimming, cycling, and running as you age.

Performance Impact

Here’s where the research gets interesting. Neither tool consistently improves strength or explosive power, but both can enhance your warm-up routine. Studies show foam rolling works best when integrated into pre-workout routines, improving flexibility without hampering performance. Massage guns excel at reducing perceived fatigue and preparing muscles for activity.

What this means for you: Don’t expect either tool to make you faster, but they’ll help you feel more prepared and move better during workouts.

Pain and Soreness Relief

Both tools help reduce muscle soreness and perceived pain, though through different mechanisms. Foam rolling appears to work by improving blood flow and reducing muscle tension. Massage guns seem to interrupt pain signals while promoting circulation in targeted areas.

What this means for you: Both can help you recover faster between training sessions and reduce the nagging aches that come with higher training loads.

Timing Matters

Research consistently shows that timing affects effectiveness:

  • Pre-workout: Both tools improve warm-up effectiveness
  • Post-workout: Foam rolling may have a slight edge for overall recovery
  • Between sets: Massage guns work well for targeted muscle preparation
  • Off days: Gentle foam rolling supports active recovery

Important Research Limitation

Most studies focus on younger adults, not specifically on triathletes over 50. However, the mechanisms these tools target—muscle stiffness, blood flow, and pain perception—become more important with age, suggesting the benefits may be even greater for senior athletes.

Other Recovery Tools Worth Considering

During our research, we discovered several emerging options that combine elements of both approaches or extend their benefits. These include vibrating foam rollers, heated massage devices, and combination tools that offer both rolling and percussive therapy.

Key Research Findings Summary

✅ Both tools improve flexibility and range of motion
✅ Both reduce muscle soreness and perceived pain
✅ Both enhance warm-up effectiveness
✅ Neither significantly improves strength or power
✅ Both support faster recovery between sessions

How to Get the Most From Foam Rolling and Massage Gun Therapy: Senior Triathletes’ Experiences

While Coach Kurt Madden and I [Terry] were talking about how seniors can adapt general training plans, Kurt noted that a massage gun can help prevent injury by loosening connective tissue. This led to me trying a massage gun provided by Bob and Brad. In Product Review: Bob and Brad C2 Massage Gun, I reported on my wife Joy’s and my experience, with Joy treating her shoulder pain and me treating spasms of a muscle in my upper back.

Here’s what Jim has learned from practical experience:

Massage Gun: Quick Relief When Time is Short

The massage gun excels when you have limited time but need to address muscle pain or tightness. The key insights from Jim’s experience:

Speed control matters: Don’t default to the highest setting. Use just enough speed to stimulate the muscle without causing pain. You want stimulation, not punishment.

Direction technique: Move the gun up and down the length of the muscle, not across it. This follows the muscle fiber direction and feels more natural.

Time efficiency: You’ll be amazed how just one to two minutes of targeted work can make a significant difference. This makes the massage gun perfect for pre-workout preparation or quick relief during busy days.

Foam Rolling: Total Body Recovery System

The foam roller shines as a comprehensive recovery tool that can address your entire body more efficiently than any massage device. For senior triathletes dealing with the cumulative fatigue of longer training sessions, this whole-body approach is invaluable.

Combining techniques: The secret to profound results lies in combining two movements:

  1. Cross-friction: Roll perpendicular to the muscle fibers first
  2. Lengthwise rolling: Then roll up and down the length of the muscle

This two-step approach for each muscle group delivers significantly better results than simple up-and-down rolling alone.

A proven routine: Rebecca Kennedy’s 20-minute foam roller class on Peloton [Try for free] provides an excellent template that makes the technique simple to follow. Doing this routine every evening while watching TV has proven transformative—even after challenging rides like 80 miles with 3,000 feet of elevation gain, morning stiffness becomes virtually non-existent.

Target muscle groups for comprehensive coverage:

  • Back: Focus on the thoracic spine area
  • Lats: Essential for swimmers and cyclists
  • Abductors: Often neglected but crucial for hip stability
  • Calves: Critical for runners and cyclists
  • Glutes: Key for power and injury prevention
  • Quads: Major workhorses for cycling and running
  • Hamstrings: Balance the quad work and support hip function

Daily routine recommendation: Twenty minutes of evening foam rolling while watching television creates a sustainable habit that delivers consistent results. The key is making it routine rather than something you only do when problems arise.

In Summary: The Bottom Line for Senior Triathletes

Here’s how foam rolling and massage guns stack up across key areas that matter to senior triathletes:

GoalFoam RollingMassage Gun
Large muscle groups✅Covers big areas (quads, hamstrings, calves, glutes) efficiently❌ Small coverage area; time-consuming for large muscles
Target specific knots❌ Less precise pressure control✅ Excellent pinpoint targeting
Pre-workout flexibility✅ Proven to improve range of motion✅ Great for warming up smaller muscles
Deep tissue work⚠️ Limited by body weight and roller hardness✅ Deeper tissue penetration
Daily routine friendly✅ Inexpensive, silent, no batteries required⚠️ Higher initial cost, may be noisy, requires charging
Learning curve⚠️ Requires proper skill✅ Easier to target problem areas
Main variablesFoam hardness, individual weight, surface on which rolling occursHead speed and amplitude, stall force, head design

Choose foam rolling if: You want a cost-effective, quiet tool for daily use that covers large muscle groups efficiently and fits easily into any routine.

Choose a massage gun if: You need precise targeting of problem areas, want deeper tissue penetration, and don’t mind the higher cost and noise.

Choose both if: Your budget allows and you want the most comprehensive recovery toolkit. Use the massage gun for pre-workout preparation and spot treatment, foam rolling for post-workout recovery and daily maintenance.

The science supports both approaches for the recovery challenges that matter most to senior triathletes—maintaining flexibility, reducing soreness, and supporting consistent training. Neither is a magic bullet, but both are valuable tools when used correctly and consistently.

What’s Your Experience?

What more would you like to learn about using foam rolling and massage gun therapy to improve your flexibility and reduce recovery time? Have you tried combining both approaches? Let us know in the Comments below.

Comments: Please note that I review all comments before they are posted. You will be notified by email when your comment is approved. Even if you do not submit a comment, you may subscribe to be notified when a comment is published.

Practical and Purposeful Return to Running for Senior Triathletes 

by Kurt Madden

As an active senior, there may come a time when you find yourself needing to pause your regular running routine. Whether it’s due to an injury, a family commitment, extensive travel, or simply needing a mental and physical reset, stepping away from running—even for just a few weeks—can feel like you’re losing momentum. 

But here’s the truth: taking a break doesn’t mean you’re starting over. In fact, with the right mindset, a thoughtful strategy, and a bit of grit, returning to running can feel like a powerful act of renewal—one that rekindles your passion, restores your rhythm, and reconnects you to your purpose as an athlete. 

As you prepare to lace up your shoes again, consider the following five key questions to guide your journey: 

  1. How often and how far should I run? 
  1. What type of running route works best at this stage? 
  1. What gear updates should I make before returning? 
  1. How should I modify my nutrition to support recovery and performance? 
  1. What supplemental activities will enhance my overall fitness and enjoyment? 

Let’s break each one down and provide a roadmap that blends science with experience, practicality with inspiration. 

1. Start with Durability, Not Distance 

The key to an effective return to running is durability—not speed, not even distance. Durability means your body can absorb the impact of running without breaking down. That requires a patient build-up of your aerobic base and the strengthening of muscles, tendons, ligaments, and bones. 

After a month or more away, begin with 15 to 20 minutes of running three times per week. Keep your pace comfortable—Zone 2 pace is ideal. This zone allows you to carry on a conversation, stay aerobic, and build cardiovascular endurance with less stress. 

After two weeks of this routine: 

  • Week 3–4: Increase runs to 25–30 minutes 
  • Week 5–6: Bump up again to 35–40 minutes 

Let time, not miles, guide your progress. And remember running more isn’t always better. What’s best is consistent, smart training that supports longevity. 

2. Choose Gentle, Enjoyable Routes 

The terrain you run on matters—especially as you return to the sport. Running on softer surfaces like grass, dirt, or well-maintained trails can ease stress on your joints and help your body adapt gradually. 

If you’re in a neighborhood with primarily asphalt roads, mix in segments of trail or park pathways when possible. Choose routes with gentle inclines and rolling terrain to naturally build strength without the pounding that comes from steep hills or hard surfaces. 

Most importantly, pick routes that motivate you. Whether it’s a view you love, a place with positive memories, or a familiar stretch that brings you peace, reconnecting emotionally with your surroundings can reignite your love for running. 

3. Refresh Your Gear, Renew Your Experience 

Your running gear is your foundation. Ill-fitting or worn-out equipment can not only hinder your performance but also increase injury risk. Let’s start with shoes. 

  • Stability shoes are best for runners who overpronate or weigh more than 175 pounds. 
  • Neutral shoes work well for lighter runners with good foot mechanics. 
  • Rotate two pairs of shoes to extend their life and reduce repetitive strain. Replace each pair approximately every 250–300 miles
  • Invest in a good pair of running socks (no seams or bunching), and consider a GPS watch that tracks distance, pace, and heart rate. For more detailed feedback, a chest-strap heart rate monitor can provide data on cadence, vertical oscillation, and even ground contact time—metrics that help fine-tune your running form and efficiency. 

Getting the right gear not only enhances your performance—it boosts your confidence and enjoyment 

4. Adjust Your Nutrition to Fuel Recovery 

Running demands recovery, and recovery demands quality nutrition. One of the most powerful ways to support your return is through protein

Aim for 1.0 grams of protein per pound of body weight each day. For example, a 150-pound athlete should consume around 150 grams daily, with a focus on early-day intake to support muscle repair and energy stabilization. 

Balance that with strategic carbohydrate use—not for carbo-loading, but for smart fueling. Focus on nutrient-dense carbs around your workouts and emphasize healthy fats and hydration throughout the day. 

Your body will thank you for better recovery, less inflammation, and more sustained energy. 

5. Cross-Train to Stay Strong and Motivated 

One of the greatest advantages of being a triathlete is the built-in variety of your training. When returning to running, don’t neglect your other disciplines. 

  • Swimming helps improve cardiovascular fitness while being gentle on the joints. 
  • Cycling builds aerobic capacity and leg strength without the pounding of running. 
  • Strength training helps prevent injury, improve posture, and maintain muscle mass. 
  • Yoga or mobility work supports flexibility and mental calm, reducing stress and aiding in recovery. 

Use these tools to build a balanced fitness base, and your return to running will feel more supported, enjoyable, and sustainable. 

A Smarter Way to Train: Try TriDot or RunDot 

If you’re looking for a personalized and data-driven way to return to running, consider a TriDot or RunDot subscription.

Both platforms use artificial intelligence to create customized training plans that factor in your: 

  • Current fitness level 
  • Training history 
  • Preferred training volume 
  • Readiness and recovery 
  • Environmental conditions (e.g., heat, humidity, elevation) 

This allows you to get fitter with less stress while reducing the amount of work you can do. You’ll know exactly what pace and heart rate to target in each session. And, importantly, you’ll be able to track your progress and see measurable improvement—which is deeply motivating. 

Even a 90-day trial can give you insight and structure that makes a big difference in your return. 

Final Thoughts: Your Comeback is a Celebration 

Returning to running in your senior years isn’t about chasing your younger self—it’s about elevating your current self.  You bring wisdom, experience, and perspective to the process. You know what it means to set goals, face setbacks, and keep moving forward. Running now can be more than a workout—it can be a celebration of health, resilience, and the fire that still burns within. 

Remember: 

  • Be patient, not passive. 
  • Be curious, not critical. 
  • Be joyful, not judgmental. 

You’re not just coming back to running. You’re stepping into a new chapter with strength, intention, and heart. 

So, lace up those shoes, map out that route, and take that first step. Because every stride you take—no matter the pace—is a stride toward vitality, purpose, and lifelong movement. 

Here’s to your comeback. Let’s make it meaningful. 

Comments

Post your questions and comments about returning to running or any other topic related to triathlon training below. I will be sure that Coach Kurt Madden receives them.

Comments: Please note that I review all comments before they are posted. You will be notified by email when your comment is approved. Even if you do not submit a comment, you may subscribe to be notified when a comment is published.

Related post: How Does Choosing Running Shoes Change As We Age?

error

Enjoy this post? Please spread the word :)