Ask Our Coaches: Will A New Bike Help With Knee Pain?

Question

A veteran, 68 year-old female triathlete sent me the following question for our coaches:

I have a Trek 2500 (yes, it’s a dinosaur). I have been doing triathlons for 25 years but my knees are starting to hurt when pushing on the bike. Are there bikes you could recommend that require less pressure on the knees (I am 68).”

Coach Tony Washington’s Reply

Hi! First off, congratulations on 25 years of triathlons—that’s an incredible achievement, especially at 68. Your bike has been an amazing partner on so many adventures.

Your Trek 2500 is indeed a classic (it dates back to the ‘80s and ‘90s with its aluminum frame and more aggressive road geometry), but it’s no surprise knee issues are cropping up after all that mileage.

Knee pain in cycling often stems from overuse, improper biomechanics, or age-related changes like reduced joint lubrication or arthritis. The good news is there are plenty of ways to address it without hanging up your wheels. I’ll focus on bike recommendations that could ease knee pressure, while also covering fit adjustments, crank length, pedals/shoes, saddles, and other factors as you requested.

Remember, this isn’t medical advice—consult a doctor or physical therapist to rule out underlying issues, and consider a professional bike fit (around $150–300) for personalized tweaks.

Understanding and Reducing Knee Pressure in Cycling

Before jumping to new bikes, let’s tackle why your knees might be hurting and how to minimize strain. Cycling is generally low-impact and great for knee health because it builds strength without pounding, but pushing hard (like in tri bike segments) can overload the patella (kneecap) or surrounding tendons. Common culprits include a saddle that’s too low/high, misaligned cleats, or an aggressive posture that forces your knees into extreme flexion.

Key Adjustments Beyond the Frame

Bike Fit: Start here—it’s often the fix for 80% of cycling knee pain. Aim for a saddle height where your knee has a 25–35-degree bend at the bottom of the pedal stroke (leg almost straight but not locked). If it’s too low, you’ll overload the front of the knee; too high, the back. Fore/aft position matters too: Your knee should align over the pedal spindle when the crank is horizontal. A pro fitter can also check for leg length discrepancies or hip imbalances common in seniors.

Crank Length: I’ve moved most of my athletes to shorter cranks. I’m 6’5” and use 160mm cranks. I have set all time power PRs from 5 secs to 5 hours. One of my athletes is 5’5” and switched to 145mm. This helped he correct knee tracking and much better hip movement. Shorter cranks reduce hip angle at the top of the pedal stroke. Less strain when your hips and knees are at most extreme angles of the pedal stroke can really help with the pain.

Shoes and Pedals: Clipless pedals are great for efficiency in tris, but poor cleat setup can cause pain. Position cleats so your feet are neutral (not toe-in/out), and consider float (e.g., 6–9 degrees) to allow natural knee movement. For less pressure, try pedals with more float like Speedplay or switch to flat pedals temporarily for training. Shoes should be stiff-soled but comfy—brands like Shimano or Specialized offer wide fits for aging feet. If you have arthritis, look for vibration-dampening insoles.

Saddle/Seat: Your Trek’s saddle might be too narrow or firm after years of use. Opt for a wider saddle (140–160mm) with a cutout to reduce pressure on soft tissues. A good bike shop can measure your sit bones and should have loaner models to try before you buy. Models like the ISM, Specialized Power or Bontrager Verse are popular for endurance. Raise the handlebars or add aero bar risers for a more upright posture, which reduces knee flexion and forward lean.

Other Tips for Reducing Knee Pain

  • Warm up with 10–15 minutes of easy spinning and stretches (quads, hamstrings, IT bands).
  • Pedal at a higher cadence (80–100 RPM) to “spin” rather than mash—it’s easier on joints.
  • Strengthen supporting muscles with off-bike exercises like squats, lunges, or clamshells twice a week.
  • Build mileage gradually (no more than 10% increase per week), and use RICE (rest, ice, compression, elevation) for flare-ups.

Bike Recommendations for Less Knee Pressure

These tweaks could make your current Trek more knee-friendly, especially for training. If pain persists, a new bike with geometry that promotes less aggressive positioning might help.

If the above tweaks aren’t working. Consider these two types of bikes. They are available at your local bike shop. Ride as many as you can to see if they fit better.

  • Endurance Road Bikes: These have relaxed geometry (taller head tube, longer wheelbase) for upright riding, reducing knee bend and pressure. Great for tri training and races with aero add-ons.
  • Hybrid or Comfort Bikes for Training: More upright than road bikes, with wider tires and cushier saddles—perfect for knee relief during build-up miles or on your indoor trainer.

In Conclusion

If you’re sticking to competitive tris, an endurance road bike with aero tweaks might be the sweet spot—test ride a few to see what feels best. Many shops offer senior discounts or demo days. Keep racing strong; with these changes, you could add another 25 years!

Related post: Five Factors For Selecting a Bike For Triathlon

Cheers,

Tony Washington

Senior International Captain/Grandpa

Founder and Head Coach – Team No Coasting

Certified IRONMAN U and TriDot Coach

Certified TriDot Pool School Lane Lead

(972) 533-8583

https://app.tridot.com/onboard/sign-up/tonywashington

Questions

Do you have questions for Tony about selecting a triathlon bike? Post them in the Comments below.

Comments: Please note that I review all comments before they are posted. You will be notified by email when your comment is approved. Even if you do not submit a comment, you may subscribe to be notified when a comment is published.

Review – Train to Tri: Your First Triathlon

Looking to complete your first triathlon? Want to inspire and motivate your children, grandchildren, parents, friends, or co-workers?

If so, Train To Tri: Your First Triathlon by Linda Cleveland and Kris Swarthout is for you.  This 246-page guide provides the essential information needed to prepare for your first triathlon.

Authors: Linda Cleveland and Kris Swarthout, both USA Triathlon Level 2 coaches with lots of experience competing in triathlon and coaching triathletes.

Publisher: Human Kinetics

Who is this book for?

Train To Tri is written primarily for those considering or already committed to completing their first sprint or standard (formerly called Olympic) distance triathlon.

Even though it is aimed at first-timers, it is not just for those doing their first triathlon.  While I have completed over 40 sprint triathlons, I found several useful training tipsI have already put some of them to use.

What does the book cover?

The book opens with a 24-question Triathlon Readiness Assessment.  Results of the self-assessment help the future triathlete identify with one of three categories – bronze, silver, or gold – and select the training plan included later in the book.  This initial section also provides guidelines for choosing the specific race for your first triathlon.

I like the basic strategy of the first triathlon training plan laid out by the authors – to focus most of the training effort on your weakest leg.

You should focus the most time and effort on [your third strongest sport] to develop strength and endurance as well as improve technique. (page 9)

Gear

Once you decide to do a triathlon, you will quickly learn about the incredible amount of clothing and equipment (called ‘gear’ in the triathlon world) surrounding the sport.  Since not all the gear is necessary for your first triathlon, the authors distinguish between the ‘necessary’ and the ‘nice to have’ or ‘you can wait and decide after your first race’ gear.

Your Triathlon Support Group

Training with a group can provide the extra motivation needed to push through a training program and reap the rewards of completing your first triathlon.  A group can also help you to improve your technique more quickly.

In this chapter, the authors suggest ways to create a support network for your training in swimming, biking, and running that includes various clubs and your family, friends, and co-workers.

You may have various support group options.  For example, if you live in a retirement community, such as The Villages, Florida, you have a built-in support group in The Villages Triathlon Club.  Members train and race together with encouragement galore.

If you are working in an area without a triathlon training club in the area, you can create your own support group through a local fitness center, community pool, bike shop, and running store.  This provides flexibility to follow your specific training plan while enlisting the support of instructors and others with experience from which you can benefit.


Swim

The chapter on swimming covers the basic elements of an efficient stroke with illustrations for a proper freestyle technique.  I appreciated the suggestion for traveling and swimming, especially the advice for making use of the typical small hotel pool.

Interestingly, many triathletes find swimming to be their weakest sport.  If you are in that group, get comfortable being in the water and with swimming with other people as you will experience on race day.  Whether swimming in a pool or in open water, you will inevitably come close to, if not in contact with, other swimmers.  Staying calm is the key to finishing the swim.

If the race you choose includes an open water swim, you will want to practice swimming in open water to become familiar with ‘sighting’.   For safety reasons, I recommend adding the ISHOF Safe Swimmer (see also below) to your list of gear.

Bike

Most of us know how to ride a bicycle.  However, many have never ridden in a large group at speeds associated with a triathlon.

Therefore, the focus of this chapter is safety.  According to the authors, safety in biking begins with a review of the various components of the bicycle to make sure that they are each in good working order.   They also describe the most important cycling skills and suggestions on how to hone these, both individually and in group rides.

When riding on the road in traffic, you need to follow the rules of the road as if you were driving a car. (page 78)

Run

We all know how to run. Right?  Well, not necessarily in a way that is the most efficient or that minimizes the possibility for injuries.  About half of this chapter is dedicated to proper cadence (steps per minute) and body form.  The rest of the chapter introduces training with a heart rate monitor and training involving the three-run types included in the weekly training plans.

If you take one thing from this chapter, remember to progress slowly (the ‘10% per week’ rule) to minimize the likelihood of injury.  Unfortunately, we need to be reminded of this every so often.

Strength and Flexibility

Building strength and increasing flexibility are two keys to increasing your performance in triathlon.   For many of us who spend a lot of time sitting during their workday, lack of flexibility can be the major root cause of injury.   The authors show that a relatively small amount of time spent in strength training and stretching can lead to better performance and fewer injuries.  Plus, these are another way to ‘mix it up’ and keep the training interesting and fresh.

Nutrition and Rest

If we all know how to run, most of us are even better at fueling (aka eating).  The challenge is to eat properly.  It becomes even more complicated when we are exercising, burning more calories, trying to build muscle, and recovering from the stress of training.

Triathlon training can be a great way to shed pounds and improve your health.   Eating the right foods in the right amount and at the right time is the focus of this chapter.  The authors are clear: “Although your daily caloric burn will certainly increase based on your training volume, you don’t have a license to hit the buffet for every meal”.

The chapter begins by showing us how to calculate two important numbers related to exercise – resting metabolic rate (RMR) and caloric burn rate.  The authors discuss how to eat (or ‘fuel’ as they define it) throughout the day. This includes eating before, during, and after workouts.  Sample menus for triathlon training days help to illustrate the principles of proper fueling.

The chapter concludes with a discussion about the importance of rest within a process known as periodization.  The authors even provide a simple test to help us determine when our body is telling us to take a day of rest.

If you do not get adequate rest, the muscles will fatigue and eventually fail, resulting in injury. (page 139)

Training plans

It’s now time to put the information from the previous chapters together and begin to train for your first triathlon.   Sample 8-week training plans are provided for bronze-, silver-, and gold-level athletes for both sprint and standard distance triathlons.    I appreciate that the authors show readers how to tailor the plans to meet their particular strengths and weaknesses and their individual schedules.

Preparing to race

I love this section.  Here, the authors take the new triathlete down the ‘home stretch’ to completing their first race.

Filled with practical advice, the authors walk us through the two weeks leading up to the race.  With greater detail for race day, you can feel the thrill that begins upon waking and includes crossing the finish line and heading to the refreshment area for a cold drink and banana.

Related post: How to Choose Your Next Triathlon

Why get this book?

Train To Tri is pragmatic and focused.  It includes essential information for each of the sports of triathlon.  The authors season the information with the nuances of practicing them within a triathlon.

You can trust the USAT-certified coaches with this ‘no-nonsense’ guide.

Let us know what you think of Train To Tri

Share your experience with this book in the Comments below.

Comments: Please note that I review all comments before they are posted. You will be notified by email when your comment is approved. Even if you do not submit a comment, you may subscribe to be notified when a comment is published.

Disclaimer: Please note that SeniorTriathletes.com is a participant in the Amazon Services LLC Associates Program.  This is an affiliate advertising program that provide a way for sites to earn advertising fees.  They do this by advertising and linking to amazon.com. Amazon, the Amazon logo, AmazonSupply, and the AmazonSupply logo are trademarks of Amazon.com, Inc. or its affiliates.  As an affiliate, I will receive a small commission for any purchases of this product that you make through Amazon.

This post was originally published on January 21, 2018.  It was updated on September 5, 2025.

Restarting To Bike After A Crash

A bike crash, whether it involves another vehicle or not, can be traumatizing, It can end one’s triathlon career even if the physical wounds heal.

This post is meant to answer a question from a member of the Senior Triathletes community about restarting to bike after an accident with injury.

Restarting to Bike After a Crash Can Be Physical and Emotional

One of Our Community members, Marty Hunter, knows too well how devastating a bike crash can be. She wrote the following when I asked our readers to share topics about which they would like to learn:

“[I am e]xperiencing difficulties recovering from a bike accident. Wondering what other athletes did to cope.”

Here is the background.

Training for Ironman Arizona in 2021, Marty fell on her bike while clipped into the pedals. A femur was broken in the fall, After surgery to repair it, she went through a period of walking with a cane and through many physical therapy appointments.

Even after healing physically, Marty has not recovered emotionally. She has ridden on a trainer but struggled to ride her bike outdoors on roads or trails. She told me “mentally, I’m mush”.

I am rooting for Marty to realize her dream of completing Ironman Arizona. So, I tapped into the experiences of others in our community who have been through this process of recovering from a bike crash. I am hoping their advice will help Marty return to training and racing.

Advice from Coach Jenn Reinhart

The first one to offer help was Senior Triathletes coach Jenn Reinhart. She is familiar with recovering from a bike crash having experienced a few, including being hit by a car, during her triathlon career.

Jenn and Marty spoke, after which Marty shared what she had learned from Jenn.

“Jenn found the right words to cut through my anxiety, especially my fear of being too old [to pursue my Ironman goal]. I tend to look way-way too far ahead instead of celebrating smaller but no less significant triumphs. 140.6 miles [of the Ironman] is huge. However, an 800 yard swim, 25 mile ride, and three to six mile run are totally doable. Each of these is great on it’s own. Being able to thread them together will be a mental podium finish for me.

“The basics are what I need to return to. Just get on the bike without any pressure for distance or pace at this time. Get confidence back for clipping [biking shoes] in and out. Eventually get the legs ready for power drills on the trainer.”

Advice from Other Senior Triathletes

I also spoke with two senior triathletes, Donna Maquire and Gene Peters. Both are Ironman finishers and have been injured in a bike crash.

Donna Maquire

During a triathlon in 2022, an impatient driver decided to turn when he should have waited. Because the bike course made a left turn, Donna was slowing down. These two factors – the car moving at a still low speed while accelerating from a stop and bikers slowing down for the turn – led to Donna ‘bouncing off’ the car’s side.

While her bike was undamaged, her back was fractured in three places. This was the beginning of nearly a year of back-pain as the back bones mended and aggravated discs were treated.

Within a couple of weeks of the accident, Donna was able to ride inside on the trainer. Four months after the crash, she did her first ride outside. This ride was not long and in her neighborhood where traffic is light and slow. She has continued to ride longer as time went by.

Given her experience following the crash, she does most of her training rides on a relatively flat trail near her home. She still struggles with pain when riding on hills.

Donna’s advice for Marty is to get back on a bike or trainer. When outside, never ride alone and always stay alert for cars. She uses a rear view mirror mounted on her glasses and a Garmin Varia radar that detects traffic from behind her.

She added, “Go slow. Increase the distance you ride a little at a time. And, be patient. As you ride more, you can expect your fitness and confidence to improve.”

Gene Peters

Gene Peters (look for his story here soon) told me of his experience while on his first ride after moving to Park City, Utah. During this ride, he collided with a car. In the accident, his back was broken in two places.

How did he get back to riding after healing?

The first time out after recovering, Gene rode less than six miles, enough to get comfortable riding.

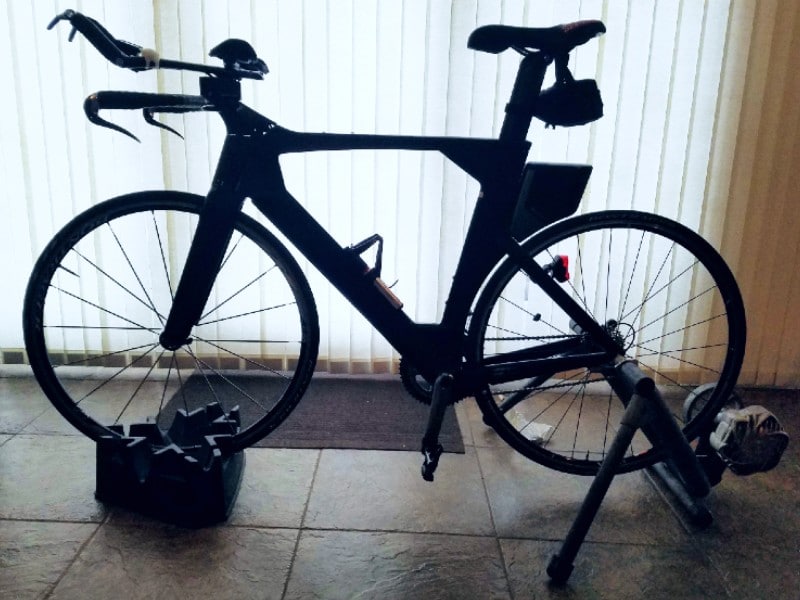
Gene says that he is always concerned about cars, but realizes that there are some times when you can’t avoid riding with them around. This is another reason he does a lot of this bike training on the Computrainer his wife bought for him.

My Experience With Clip-In Shoes

I have not been in a serious accident with my bike. However, I have fallen twice during races, once because I was clipped in the pedals and unable to unclip quickly enough.

My first fall, at my Rhode Island triathlon, occurred because of a flat front tire.

I fell a second time, at a triathlon in Arkansas. This time, the fall was because I was not able to unclip my shoes quickly enough after the chain came off and jammed between the wheel and sprocket.

Interestingly, upon returning to the transition area after the bike leg of this triathlon, I saw another racer use traditional pedals with a toe cage (not clip-in) with his triathlon bike. I followed this example for the next several triathlons.

Besides making it easier to get in and out of the pedals, this configuration eliminates time in T2 to put on running shoes.

One qualifier: I am not sure this is valid for longer distance races. However, it can be helpful for restarting to bike after a crash.

Conclusions

A bike crash, especially one with an injury, can produce a major setback in one’s triathlon training. However, in most cases, it need not be career ending.

The concensus among other senior triathletes for restarting biking after a crash is to begin by getting on the bike for short rides. Ride in a safe area. And, if appropriate, use equipment that makes you feel safe, such as pedals and normal running shoes instead of clip-in shoes and pedals.

While you are regaining confidence riding outdoors, build your biking endurance using a bike trainer or stationary bike. Eventually, you will be able to put the bike handling and bike fitness pieces together.

Comments

What advice do you have for restarting to bike after a crash? Share your comment below.

Comments: Please note that I review all comments before they are posted. You will be notified by email when your comment is approved. Even if you do not submit a comment, you may subscribe to be notified when a comment is published.

Triathlon Bike Training When You Can’t Ride Outside

How does training for the bike leg of triathlon occur when you can’t ride outside? There are more opportunities than you might imagine.

It’s Getting Cold Outside

I woke this morning to an outside temperature of 11°F (-12°C) and new snow. On top of this, the fitness centers are closed because of COVID-19 restrictions.

I don’t have, nor do I intend to purchase, a fat tire bike for riding in the snow.

Fat tire bikes with studded tires are preferred for a winter triathlon.

So, how can I maintain fitness for the bike leg of triathlons in which I hope to compete next spring?

There are plenty of options. While these may not be as good as going to a warm climate where I can ride outside, they still take away any excuses.

In this post, I will highlight the training I intend to use over the next several months to prepare for my next races.

Bike Trainer

The most common way of developing bike fitness without riding outside is to use a trainer. In most cases, you connect your road bike or triathlon bike to one of many styles of trainer.

One benefit of using a trainer is that you develop and maintain a familiarity with the bike you will use for your next triathlon.

Trek SpeedConcept triathlon bike connected to a Saris CycleOps Fluid2 trainer for bike training when I can't ride on roads or trails.
Trek SpeedConcept on a Saris CycleOps Fluid2 trainer.

When the fitness centers re-open, I will also use their stationary bikes both for individual sessions and classes. I prefer the latter.

My trainer session, usually one hour, is divided into a few periods. Each segment is designed to work on a different goal. Breaking up the session also helps to prevent boredom. (Trainer sessions are also a great time to catchup on one of my favorite podcasts.)

A common one hour trainer session involves:

  • Warm up – 10 minutes at a moderate pace, 80-90 rpm cadence.
  • Single leg drill – 5 repetitions of 1 minute per leg at 80-90 rpm cadence – 10 minutes total. (NOTE: This may not be advisable for some trainers, but is for the Saris CycleOps Fluid2.)
  • Intervals – 5 repetitions of 4 minutes in the highest gear in which I can maintain 60 rpm cadence followed by 2 minutes easy at 80-90 rpm cadence – 30 minutes total.
  • Cool down – 10 minutes at moderate pace, 80-90 rpm cadence.

You can find many workouts to match your current fitness level and specific goals on-line or in books like “The Big Book of Bicycling” by Emily Furia and the Editors of Bicycling.

Advantages

  • Safer than riding in traffic or in the aero position on winding trails shared with pedestrians, especially in the winter but really any time of the year.
  • Efficient – A rule of thumb is that one hour on a trainer represents two hours riding on the road because you aren’t (or shouldn’t be) coasting on the trainer.
  • Some training, such as single leg drills, are best done on a trainer.
  • Accessible within your house or apartment.

Disadvantages

  • Static trainers don’t help to develop stability and coordination or bike handling skills.
  • Can be terribly boring. Some call these sessions the ‘purgatory’ of bike training.

Strength and Endurance Exercises

Strength training throughout the year should be a regular part of a triathlete’s training. I recommend Mark Allen’s program, especially if your fitness center is open.

However, if it isn’t or you want to give extra attention to strength training for the bike leg, look at the TrainingPeaks routine.

Except for the row, the exercises that involve weights can be done with homemade alternatives such as a weighted backpack (kettlebell) and plastic jugs filled with water (8 pounds per gallon/1 kilogram per liter) or other materials (beans, sand, coins) depending on the desired weight.

Advantages

  • Allows you to focus on strengthening the weakest areas for the greatest improvement.
  • Can be done from the convenience of home or at a fitness center.

Disadvantages

  • The only disadvantage of which I am aware is that doing exercises without the benefit of a coach or training partner can lead to less than optimal results because of poor form.

Cross-Country Skiing

cross-country skiing is effective cross training for cycling
Cross-country skiing is a great way to cross train for cycling while enjoying fresh air and sun. It also helps prepare for a winter triathlon involving running, biking, and skiing.

In the northern USA state where I live, Nordic skiing, or cross-country skiing, and ice skating are popular winter sports. I enjoy both skiing and skating, though have not skied for over 20 years.

Nearly every county park in our area has groomed cross-country ski trails. Larger parks also rent ski equipment (skis, boots, and poles) and offer group and personalized instruction.

Cross-country skiing produces endurance and strength for both the large muscles and the smaller muscles that support the larger muscles. Brett Sutton, coach of world champion triathletes, calls cross-country skiing “the hardest overall body workout out there”.

Downhill skiing is also good for building lower body and core muscle strength and for improving balance and coordination. However, downhill skiing does not yield the endurance benefits of cross-country skiing. Also, it much less accessible and more expensive than cross-country skiing.

“Nordic skiing, or cross-country skiing, is also great cross training for cycling. While downhill skiing brings more strength gains than endurance, Nordic skiing brings more endurance gains along with the added development of supporting muscles.”

ILoveBicycling.com

Classical vs. Skate Skiing

Today, there are two types of cross-country skiing – classical and skate-skiing.

Classical cross-country skiing involves a kick and glide motion. Skis remain parallel to each other, unless ‘snow plowing’. The classical cross-country ski courses are characterized by the parallel ruts in which the skis glide.

Cross-country skiing can also be done on fresh snow, that is, without a groomed trail. Most snow covered walking or bike paths are a candidate for classical skiing.

In contrast, the side-to-side motion in skate-skiing is like that of ice skating. Therefore, it uses muscles even more similar to those for pedaling.

One disadvantage of skate-skiing is that it requires a groomed trail. This makes it less flexible in where it can be done. Skate-skiing is also more difficult because it requires greater balance and coordination. However, it is faster than classical skiing.

Advantages

  • Provides both endurance and strength benefits.
  • Accessible – classical cross-country skiing can be done at your nearest park, golf course, or snow-covered lake. (Be sure the golf course is open for skiing and the ice on the lake is thick enough.)
  • Relatively inexpensive, especially compared to downhill skiing.
  • Gets you outside, into the fresh air and, hopefully, the sun. Think Vitamin D.

Disadvantages

  • While cross-country skiing uses many of the same muscle groups as cycling, you may put more strain on certain muscles and tendons than when biking. To avoid injury, start slow and increase distance gradually.
  • A beginning skier is likely to fall. Expect it and try to relax as you fall to avoid significant injury.

Note

From the reading I did in preparing this post, I have taken the first steps in scheduling cross-country ski lessons at a nearby county park. I am hoping to learn to skate-ski.

Ice Skating

Most cities in the northern climates, large or small, have an outdoor ice skating rink. Elsewhere, given the popularity of ice hockey, many of the more populated areas in the USA and Canada have indoor ice arenas.

Ice skating, like skate-skiing, is great for working smaller muscles that are often overlooked but valuable for biking performance. It is also great for improving balance, flexibility, and coordination.

Ice skating is an effective way to strengthen small muscles often overlooked in strength training yet important for cycling performance.

Advantages

  • Great for strengthening leg and abdominal muscles. Skating is also reported to increase the flexibility of more joints than cycling and running by strengthening ligaments and connective tissue around these.
  • Low impact, unless you jump or spin (or fall often).
  • Relatively inexpensive, often free (after purchasing or renting skates) if you live in a climate where outside temperatures are consistently below freezing. Even small towns typically have an outdoor ice skating rink open to the public.
  • Gets you outside, into the fresh air.

Disadvantages

  • Ice skating requires good ankle strength (which you probably have as a runner). However, you may put more strain on some muscles and tendons of the feet and ankles than when biking. As with any new sport, start slowly and increase gradually.
  • Expect to fall, especially as you begin. At least that’s my experience. However, since I am usually bundled up for the cold, I have seldom been injured and then only with a bump or bruise to my ego.

No Excuses!

None of us has an excuse related to weather for not continuing to train for the bike leg of a triathlon throughout the winter. Even if I stay in the north part of the USA, there are plenty of opportunities inside and outside my house.

Some may actually be better than riding outside.

How Do You Train for Triathlon Biking When You Can’t Ride Outside?

How do you continue training for the bike when you cannot ride outside? Share your comments below.

error

Enjoy this post? Please spread the word :)